 SUPPORT
 3EX United States
 Blog
A 2023 report from the Uptime Institute reveals that 60% of data center outages now result in financial losses exceeding $100,000 per incident. For enterprise leaders, the stakes of moving infrastructure are incredibly high. You understand that even a few minutes of unexpected latency can trigger severe SLA penalties and damage client trust. Successfully minimizing downtime during data center migration isn’t just a technical goal; it’s a fundamental requirement for business continuity.
It’s natural to worry about data loss during transit or discovering that legacy hardware doesn’t fit the new site’s power profile. We’ve built this guide to replace that anxiety with a documented, technical framework designed for a zero-impact cutover. You’ll learn how to execute a migration that maintains your superfast performance standards while ensuring every server is validated before the first packet of live traffic hits the new cabinet.
This checklist provides a step-by-step roadmap covering pre-migration audits, real-time synchronization strategies, and post-move hardware verification. Let’s look at the exact steps needed to keep your systems stable and your leadership team confident.
Key Takeaways
- Identify and map all physical assets and virtual dependencies to eliminate technical blind spots before the migration begins.
- Discover how “Swing Space” and parallel infrastructure strategies maintain service availability while your new environment is being built.
- Master physical logistics using pre-wiring and “Rack and Stack” tactics to eliminate installation delays and cabinet-level disruptions.
- Implement rigorous post-migration smoke testing and application-level validation to guarantee immediate data integrity and connectivity.
- Learn why leveraging specialized remote hands support is essential for minimizing downtime during data center migration and ensuring long-term operational stability.
The Pre-Migration Audit: Mapping Dependencies and Risks
A successful transition relies on visibility. Minimizing downtime during data center migration is only possible when you possess a granular understanding of every asset. Start with a 100% inventory audit of physical hardware and virtual environments. This isn’t just about counting servers; you need a list of serial numbers, MAC addresses, and specific rack locations for every piece of equipment. For virtual assets, document exact CPU allocations and storage IOPS requirements to ensure the new environment matches your current performance levels.
Categorize services by their business impact. Research shows that 85% of migration delays stem from overlooked dependencies. Rank applications into tiers: tier one includes mission-critical services that require near-zero latency failovers, while tier three includes non-essential services that can tolerate longer windows. Establishing a performance baseline is mandatory. Record 30 days of telemetry, focusing on average latency and peak traffic loads. This data serves as your benchmark for post-move validation. Understanding the data migration process helps you identify where bottlenecks occur during the transfer of large volumes.
Define the “Point of No Return” for your migration window. This is the specific timestamp when the cost of rolling back exceeds the risk of moving forward. For a typical 12-hour migration window, this often falls at the 4-hour mark. If critical systems aren’t syncing or hardware hasn’t cleared POST by this time, you must trigger the rollback procedure to maintain business continuity.
Application and Data Dependency Mapping
Dependency Mapping is the process of identifying how software components interact within the infrastructure. You must document every inter-server communication path to prevent broken links post-move. This includes internal SQL calls and external API connections with third-party vendors. Even a single missing firewall rule for an external service can cause a complete application failure. Use automated discovery tools to find hidden connections that manual logs might miss during the planning phase.
Risk Assessment and Mitigation Planning
Identify single points of failure, such as servers with single power supplies or aging hardware without redundancy. Verify that all hardware warranties and support contracts are active before the move begins. If a component fails during transport, you need a 4-hour onsite response guarantee. Create a detailed rollback plan for every phase. If you’re utilizing move-in assistance, ensure the technical team has full access to these protocols to maintain stability and speed throughout the project.
Parallel Infrastructure: The Key to Zero-Downtime Transitions
To achieve zero-downtime, you can’t simply unplug a rack and hope for the best. The “Swing Space” strategy involves building a mirrored environment in the target facility while the source remains fully operational. This overlap ensures that services stay live throughout the entire process. It’s about redundancy. By the time you’re ready to flip the switch, the new environment is already tested and ready for production traffic.
Leveraging managed cloud hosting acts as a vital buffer during transit. It provides a temporary failover layer if physical hardware transit takes longer than your scheduled window. Comparing migration paths is equally critical. Physical-to-physical moves carry high risk; 60% of migration-related outages stem from human error during hardware handling according to Uptime Institute 2023 data. Virtualized paths allow for snapshots and live migrations, which are significantly more stable for minimizing downtime during data center migration.
The cost-benefit analysis of temporary redundant hardware is clear when you look at the numbers. While maintaining two environments for 30 days increases short-term expenses, it’s a fraction of the cost of an unplanned outage. If your enterprise loses thousands of dollars per minute of downtime, the investment in a parallel setup is a necessary insurance policy. Our move-in assistance team often helps clients bridge this gap with superfast setup times to keep the dual-running period as efficient as possible.
Establishing a Secure Network Bridge
You need a stable, high-speed link between sites. Set up cross-connect services to link the old and new environments directly. Use dedicated circuits or encrypted VPNs for secure synchronization. Test your network throughput at least 21 days before the move. This confirms that data replication speeds can handle your volume without bottlenecking the migration timeline. A secure bridge ensures that the two environments act as a single, cohesive unit during the transition.
Data Replication and Synchronization Strategies
Success in minimizing downtime during data center migration depends on how you handle the data delta. Start with asynchronous replication to seed the bulk of your data. This method doesn’t impact production performance. As you approach the final cutover phase, switch to synchronous replication to keep both sites in lockstep. Always use checksum validation. It’s the only way to guarantee data integrity and ensure that every byte on the new NVMe SSD storage matches the source exactly before you decommission the old site.
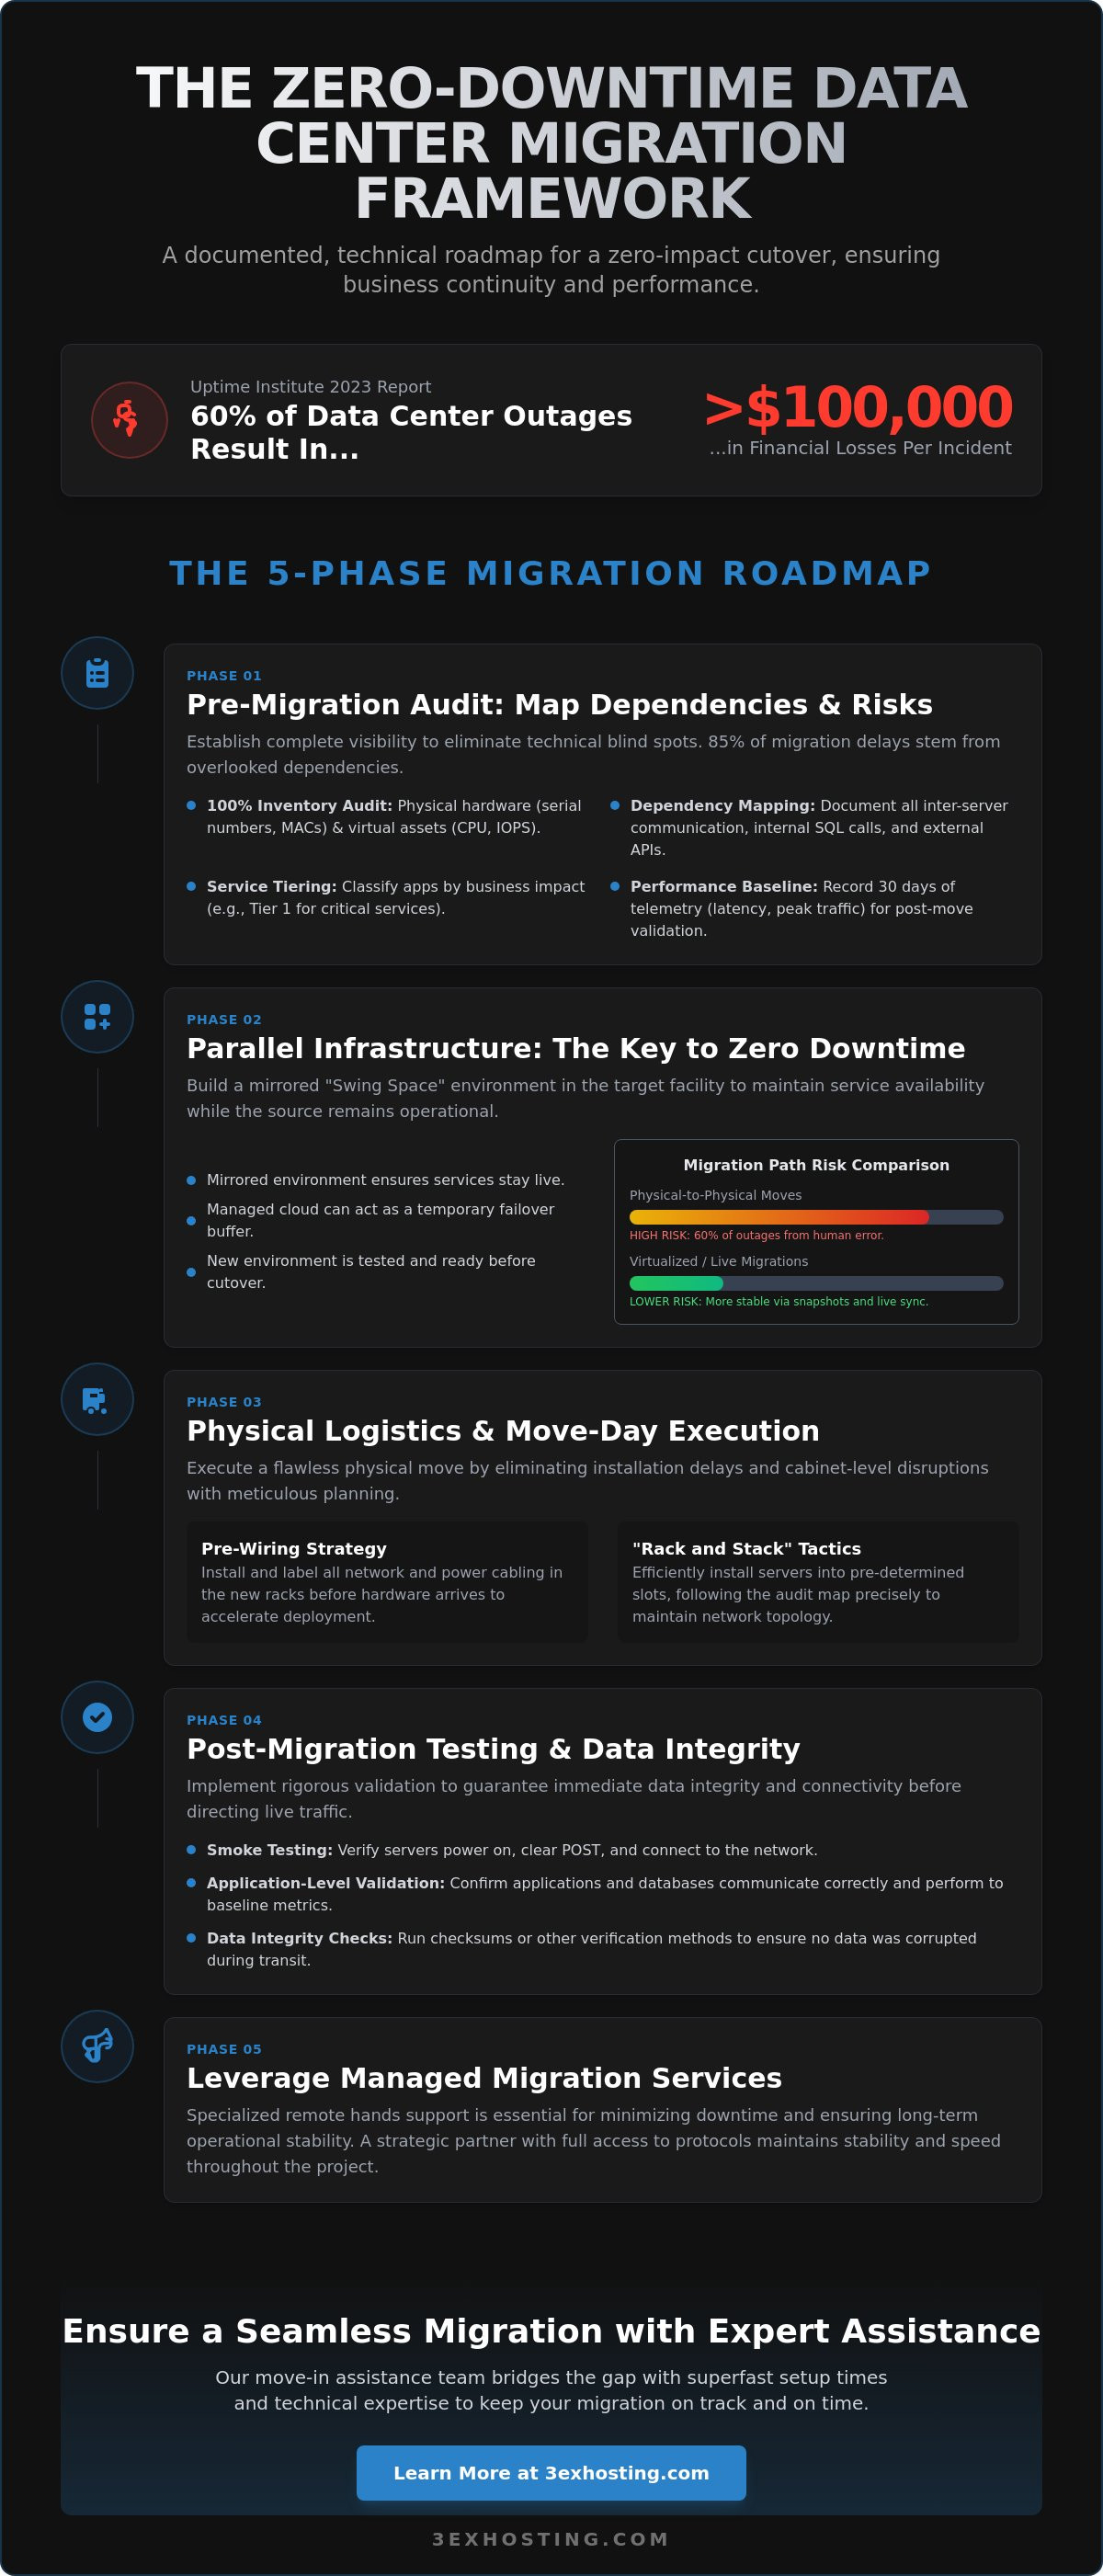
Physical Logistics and Move-Day Execution Tactics
Physical logistics represent the highest risk for hardware damage and extended outages. Successfully minimizing downtime during data center migration requires moving beyond simple “lift and shift” mentalities. A “Rack and Stack” strategy is the gold standard for maintaining high availability. By staging new cabinets at the target facility before the move begins, you eliminate the 4 to 8 hours typically wasted on assembling rails and cable management arms on move day. This approach allows for a “swing” migration where services transition to new hardware or pre-staged environments with zero physical delay.
Pre-wiring the new facility is a non-negotiable step. Every power whip, fiber jumper, and copper patch cable should be installed and verified 72 hours before the hardware arrives. When the transport vehicles pull up, your technicians focus solely on mounting servers and connecting power. Utilizing professional Move-In Assistance provides access to specialized lifts and handling tools. This reduces the risk of human error or physical injury during the transition of heavy, high-value enterprise assets.
The Move-Day Physical Checklist
Precision execution on move day prevents the “hidden” downtime caused by missing cables or damaged components. Follow these four critical steps:
- 1. Power down and label: Use a standardized naming convention for every cable. Label both ends of the connection to ensure 1:1 mapping at the destination.
- 2. Secure internal components: High-density GPU servers often require internal bracing or the removal of heavy cards during transit. Vibration during transport can loosen PCIe seats or heat sinks.
- 3. Execute transport: Use climate-controlled, air-ride vehicles. Standard freight trucks lack the suspension needed to protect sensitive disk arrays and optical components from G-force impacts.
- 4. Re-rack hardware: Follow the pre-designed cabinet layout exactly. This ensures that airflow patterns and weight distribution remain within the facility’s engineered tolerances.
Optimizing the Physical Environment
The destination environment must be ready for immediate load. Verify that power density and cooling capacity meet the specific requirements of high-performance AI clusters, which often exceed 15kW per rack. Test every PDU connectivity point and confirm that redundant power feeds (N+1 or 2N) are active and balanced. Adhering to full cabinet colocation standards ensures that blanking panels and cold-aisle containment are in place. These details prevent thermal throttling, which is a common cause of performance degradation immediately following a migration. Professional environments provide the stability needed for a “plug-and-play” experience on day one.
Testing Protocols and Data Integrity Verification
The physical relocation of hardware is only half the battle. The hours following the equipment’s arrival at the new facility determine the success of the project. To succeed in minimizing downtime during data center migration, your team must execute a validation sequence that moves from the physical layer up to the user experience. This isn’t the time for guesswork; it’s the time for rigid checklists.
Post-migration smoke testing starts with power and connectivity. Technicians confirm every PDU is balanced and every switch port shows a link light. Once the foundation is stable, application-level validation begins. Services shouldn’t just be up; they must respond to specific API calls and database queries with the same speed as before. We recommend running automated scripts to verify that load balancers are distributing traffic correctly across the new IP space.
Network performance requires objective measurement. Compare post-move latency against the baselines you recorded at the old site. If latency has jumped by more than 12%, investigate routing tables or carrier peering immediately. Finally, User Acceptance Testing (UAT) involves stakeholders from different departments. They must confirm that internal ERP systems and external customer portals function without data loss or session errors. A 2023 industry survey found that 64% of migration delays occur because of overlooked application dependencies during this phase.
The Post-Move Validation Framework
This framework focuses on the physical and logical health of your infrastructure. Engineers must verify all cross-connects are active and delivering the bandwidth specified in your SLA. Storage health is a high priority; use vendor tools to check RAID status and disk consistency after the physical vibration of transport. It’s a known industry reality that hardware often fails immediately after a power cycle, requiring on-site spares to be ready for instant replacement.
Final Cutover and DNS Propagation
Managing the cutover requires precision. Lower TTL (Time to Live) values for DNS records to 300 seconds at least 48 hours before the move. This ensures changes propagate globally within minutes rather than hours. Execute the final data sync using rsync or block-level replication to capture any changes made during transit. Once traffic switches to the new IP space, monitor logs for 404 errors or connection timeouts. If error rates exceed 0.5% of total traffic, be prepared to trigger a rollback or fix routing issues in real-time. This level of detail is essential for minimizing downtime during data center migration.
Ensure your transition is handled by experts who understand these technical nuances. Explore our move-in assistance services to protect your hardware and data integrity.
Strategic Partnership: Leveraging Managed Migration Services
Moving enterprise-grade hardware isn’t a DIY project. It’s a high-stakes operation where every minute of lag costs thousands. Professional remote hands support acts as the critical bridge between your old facility and the new rack. By delegating physical tasks to on-site experts, your internal IT team focuses on software integrity and data validation. This specialization is the most effective way of minimizing downtime during data center migration.
According to Uptime Institute’s 2023 report, 55% of outages are caused by human error during physical changes. Expert migration services eliminate these risks through standardized checklists and proven rack-and-stack protocols. These partners don’t just move boxes; they provide a managed IT infrastructure framework that ensures long-term operational stability. Integrating disaster recovery solutions into the new footprint from day one creates a resilient environment where failover is a feature, not a frantic last resort.
The Value of 24/7 Remote Hands
On-site technicians provide immediate hardware troubleshooting without requiring your staff to travel across time zones or fight traffic. In carrier hotels, where interconnections are complex and dense, having a pro on the floor ensures cross-connects are patched correctly the first time. You can find more details on maximizing operational efficiency in the Remote Hands Support guide. These experts handle physical reboots, cable management, and inventory audits, keeping your infrastructure stable while minimizing downtime during data center migration. They act as your eyes and ears, resolving physical layer issues before they escalate into network-wide outages.
Scaling for the Future
Migration is the perfect time to evaluate your current footprint and future-proof your growth. Many enterprises transition from shared racks to private colocation suites to gain full sovereignty over their environment. As AI demand surges, preparing for high density GPU colocation becomes a priority. Modern liquid-cooled or high-airflow setups require specific power densities that legacy centers can’t provide.
- Reduced Internal Burden: Expert move-in assistance frees your staff for high-value architecture tasks.
- Expert Troubleshooting: Immediate response to hardware failure during the critical “burn-in” phase.
- Future Readiness: Designing for 30kW+ racks today prevents another move in 24 months.
Strategic moves require precision and technical excellence. If you’re ready to plan your move with a partner that prioritizes stability and speed, get a custom migration quote from 3EX Hosting today. We provide the technical foundation so you can focus on your business.
Secure Your Infrastructure and Eliminate Migration Risks
Successful transitions rely on technical precision and rigorous planning. By mapping every dependency during your pre-migration audit and utilizing parallel infrastructure, you eliminate the risk of service gaps. Testing protocols must verify data integrity before the final cutover to ensure your systems remain operational. Achieving the goal of minimizing downtime during data center migration is possible when you leverage a professional framework. At 3ex Hosting, we provide the technical foundation required for these high-stakes operations. Our facilities feature N+1 redundant power and cooling systems to ensure 100% environmental stability for your hardware. You’ll benefit from carrier-neutral connectivity with high-speed cross-connects that keep your data moving at peak velocity. If a hardware emergency occurs, our 24/7 Remote Hands Support team is on-site to resolve it immediately. Transitioning your enterprise assets doesn’t have to be a source of stress. With the right partner, your move becomes a platform for better performance and long-term reliability. Request a Professional Data Center Migration Consultation to secure your systems today. Your next chapter of technical excellence starts with a stable foundation.
Frequently Asked Questions
What is the most common cause of downtime during a data center migration?
The most common cause of downtime is inaccurate dependency mapping and human error during the execution phase. Gartner research shows that 80% of unplanned outages result from people and process issues rather than hardware failure. If you don’t map how your applications interact, you’ll break critical links during the move. This technical oversight remains the biggest hurdle to minimizing downtime during data center migration.
How long does a typical enterprise data center migration take?
A typical enterprise data center migration takes between 6 and 12 months to complete. This timeline covers the discovery, planning, and execution phases. Large-scale projects often span 180 to 365 days to ensure all risks are mitigated properly. Rushing this process usually leads to configuration errors. You should allocate at least 50% of this timeframe purely to the discovery of existing assets and dependencies.
Can I move my servers while they are still powered on?
You can’t move physical servers while they’re powered on, but you can live-migrate virtualized workloads without service interruption. Physical hardware must be shut down to prevent mechanical damage to disk drives during transit. For virtual environments, tools like VMware vMotion allow you to shift active processes to new hardware seamlessly. This ensures your users don’t experience a single second of latency during the transition.
Is it better to move existing hardware or buy new equipment for the new site?
Buying new equipment is usually the superior choice for minimizing downtime during data center migration. Industry surveys indicate that 70% of enterprises refresh their hardware during a move to avoid the risks of transporting aging components. New gear lets you build and test the target environment while the old one stays live. This parallel setup eliminates the risk where everything must work perfectly on the first try.
How does a carrier hotel improve migration outcomes?
A carrier hotel improves outcomes by offering direct, low-latency access to hundreds of different network providers in a single location. These facilities house meet-me rooms where you can establish cross-connects in under 24 hours. This proximity reduces network hops and keeps latency below 1ms. It’s a strategic move for companies that rely on superfast connectivity and need redundant paths to prevent single points of failure.
What is the role of a “swing environment” in minimizing downtime?
The swing environment acts as a temporary staging area that keeps your applications running during the hardware transition. It uses a set of temporary servers to host your data while you move your permanent racks. This setup allows for a phased approach rather than a full shutdown. It’s a reliable way to ensure your services remain stable and accessible throughout the entire physical relocation project.
How do I calculate the cost of downtime for my migration business case?
Calculate the cost of downtime by adding lost revenue, employee productivity losses, and technical recovery expenses, then multiplying that sum by the outage duration. The Ponemon Institute estimates the average cost of data center downtime is $8,851 per minute. You should use your specific hourly billing rates and average transaction values to get an accurate number. This figure helps justify the budget for redundant systems.
What should be included in a data center migration rollback plan?
Your rollback plan must include specific Go/No-Go triggers, a 100% verified backup of all data, and a step-by-step technical reversal procedure. Every migration needs a “point of no return” timestamp, usually set at 40% of the total maintenance window. If critical systems aren’t stable by that time, you must initiate the rollback immediately. This ensures you can restore the original environment before the business day begins.