 SUPPORT


 3EX United States
 Blog
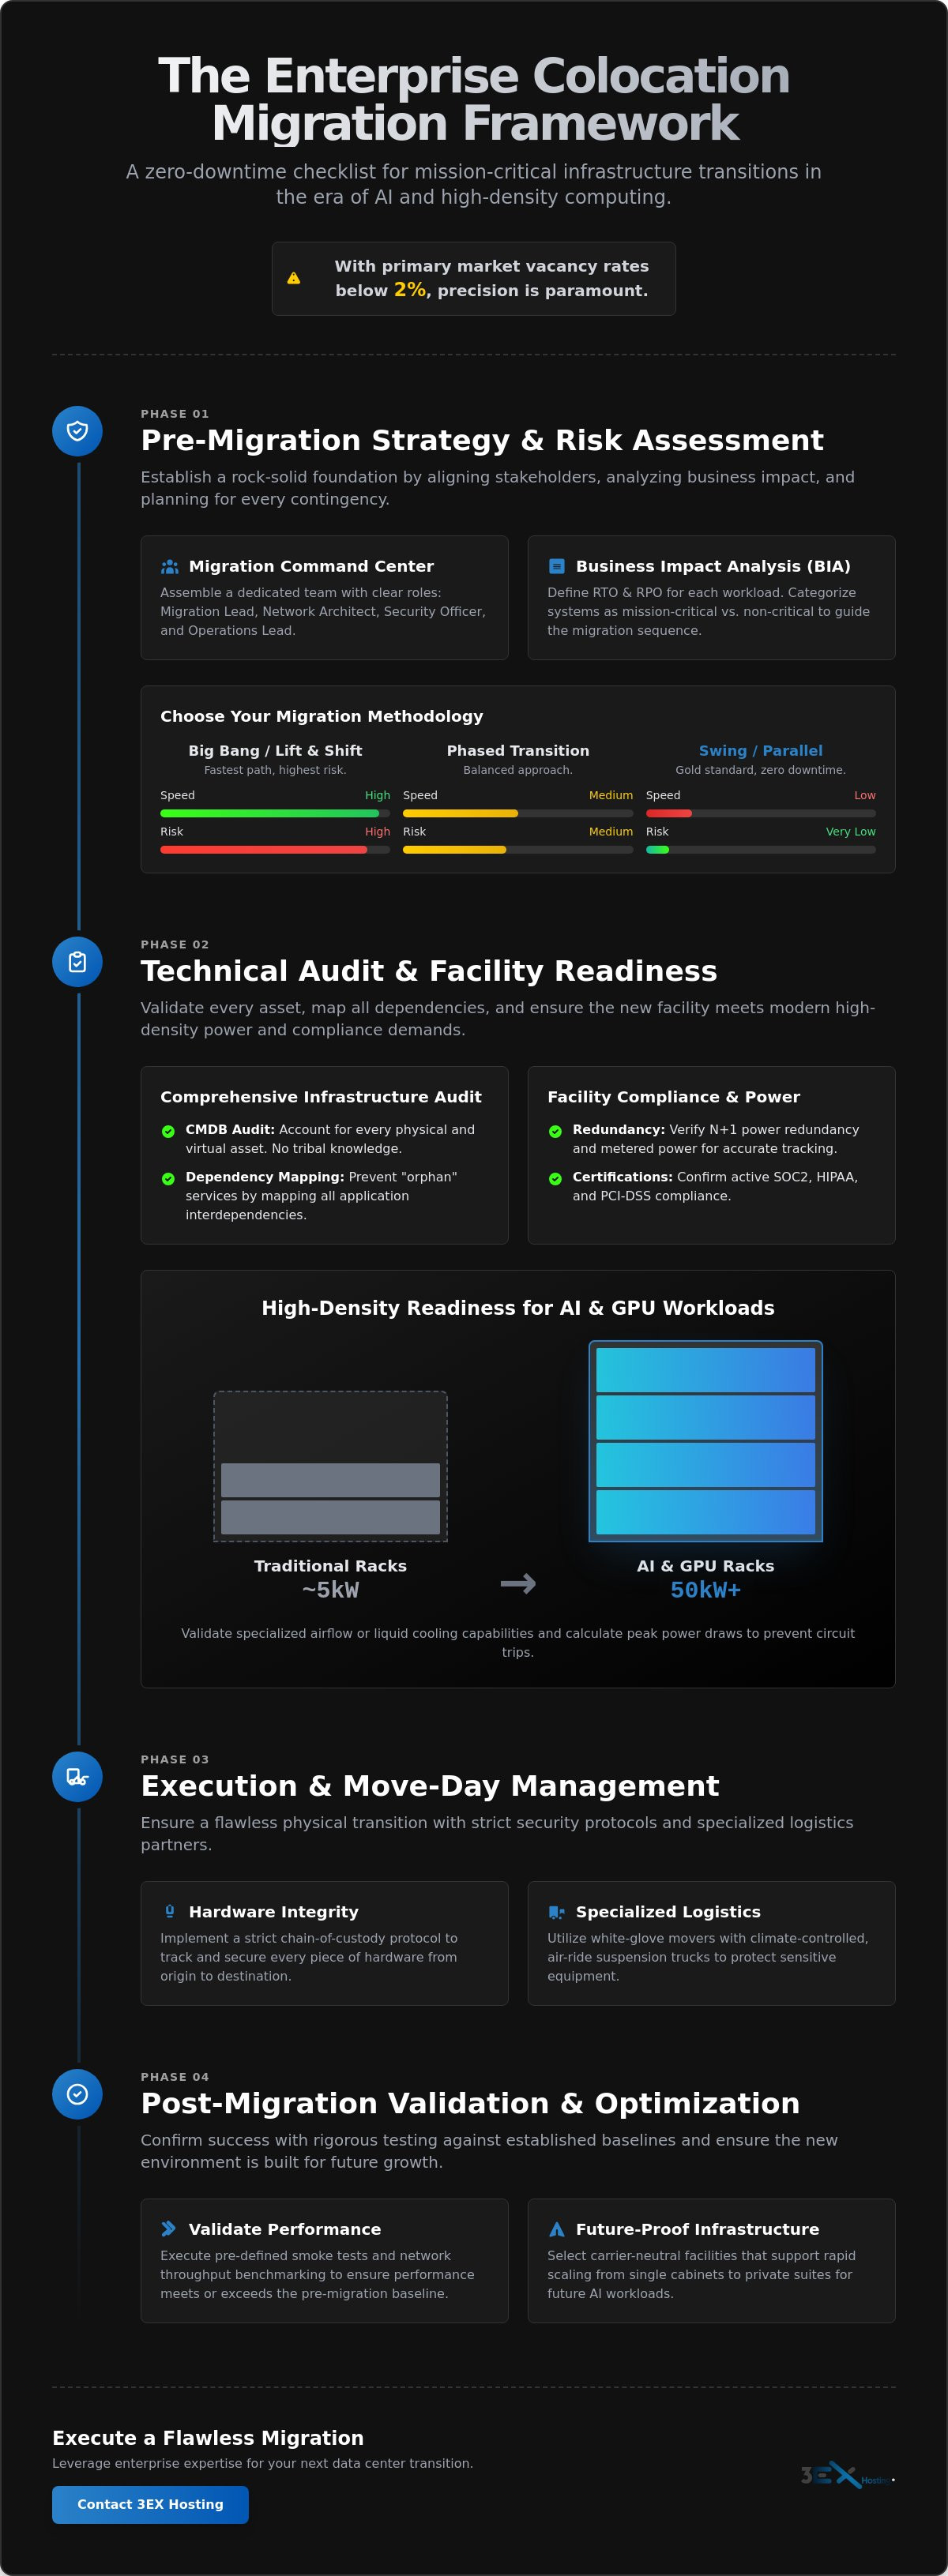
Enterprise colocation migration is a network engineering project disguised as a logistics task. While many teams focus on the physical move, the true risk lies in the invisible interdependencies of legacy systems and the aggressive high-density requirements of 2026 AI workloads. This colocation migration checklist for enterprises is designed to eliminate the uncertainty that leads to extended downtime. With primary market vacancy rates currently below 2 percent, your transition must be precise, efficient, and right the first time.
It’s natural to worry about budget overruns or a “lift and shift” gone wrong. We’ve built a comprehensive framework to help you execute a zero-downtime transition while improving your network redundancy and latency. This guide provides the technical steps to validate your move and prepare your infrastructure for racks that now frequently demand over 50kW of power. We’ll cover everything from initial dependency mapping to final post-migration validation, ensuring your mission-critical systems remain stable throughout the entire process.
Key Takeaways
- Establish a Migration Command Center to categorize mission-critical loads and perform a Business Impact Analysis (BIA) before moving a single rack.
- Utilize a comprehensive colocation migration checklist for enterprises to map application interdependencies and prevent “orphan” services during the physical transition.
- Ensure hardware integrity by implementing a strict chain-of-custody protocol and utilizing specialized white-glove movers with climate-controlled, air-ride suspension.
- Validate success through pre-defined smoke tests and network throughput benchmarking to ensure post-migration performance meets your established baseline.
- Future-proof your infrastructure by selecting carrier-neutral facilities that support rapid scaling from single cabinets to private suites for AI and high-density workloads.
Pre-Migration Strategy: Aligning Stakeholders and Risk Assessment
Successful migrations begin months before the first server is racked. You need a dedicated “Migration Command Center” to oversee every technical detail. This team must include specific roles: a Migration Lead for logistics, a Network Architect for connectivity, a Security Officer for data integrity, and an Operations Lead for system stability. Establishing this hierarchy is the first item on any robust colocation migration checklist for enterprises. It ensures that when technical challenges arise, the decision-making path is clear and immediate.
Before committing to a timeline, perform a Business Impact Analysis (BIA). This isn’t just a paperwork exercise. It’s a technical audit that categorizes your workloads into mission-critical and non-critical tiers. You must define your Recovery Time Objective (RTO) and Recovery Point Objective (RPO) for each tier. If your RTO is near zero, your migration strategy must reflect that level of redundancy. Securing executive buy-in depends on presenting a documented risk mitigation plan that protects the bottom line from unexpected downtime.
Determining Your Migration Methodology
Choosing the right approach depends on your tolerance for risk and your current data center footprint. A “Big Bang” or lift-and-shift move is often the fastest, but it carries the highest risk of extended downtime if hardware fails to initialize. Phased transitions reduce this risk by moving non-critical systems first, allowing the team to refine the process. For enterprise environments that require 100% availability, a “Swing” or parallel migration is the gold standard. This involves setting up a temporary environment to run production while the primary hardware is in transit. While more expensive, it provides a safety net that single-site moves simply can’t match.
Risk Profiling and Contingency Mapping
You must identify “Point of No Return” milestones. These are specific times in the schedule where reverting to the old site becomes impossible or more damaging than pushing forward. Every phase needs a detailed rollback plan. If a critical database fails to sync at the new facility, the team needs a pre-approved script to restore operations immediately. Ensure your disaster recovery sites are fully synchronized and tested before the primary move begins. Utilizing professional move-in assistance can help bridge the gap between planning and execution, providing the specialized expertise needed to handle complex enterprise hardware safely.
Technical Infrastructure Audit and Facility Readiness
Technical audits are the backbone of a risk-free move. You can’t rely on outdated spreadsheets or tribal knowledge. A comprehensive CMDB audit must account for every physical and virtual asset, ensuring that nothing is left behind. This step is a foundational element of any colocation migration checklist for enterprises. Mapping application interdependencies is equally critical. It prevents “orphan” services where a primary application moves but a dependent database or secondary API remains at the old site, causing immediate failure.
Beyond the software, you must audit your power requirements. Enterprise-grade facilities must provide N+1 redundancy and metered power to track consumption accurately. Validate that the target facility maintains active SOC2, HIPAA, and PCI-DSS certifications. Without these, your compliance posture could collapse the moment you rack your gear. If your current inventory is outdated, consider utilizing remote hands support to verify physical configurations before the move.
High-Density Readiness for AI and GPU Workloads
Modern AI clusters demand power densities that traditional data centers simply weren’t built to handle. When planning for high density GPU colocation, you must audit for specialized airflow or liquid cooling capabilities. Traditional 5kW per rack setups are insufficient for 2026 enterprise needs. Calculate peak power draws for every cluster. This prevents circuit trips during the massive power surge that occurs when a rack of GPU servers boots up simultaneously. Ensure your full cabinet colocation configurations support at least 15kW to 50kW per rack to avoid future bottlenecks.
Network and Interconnection Mapping
Document every physical cross-connect and virtual circuit currently in use. Network delays are the most common cause of migration setbacks. Pre-provision carrier-neutral bandwidth at the new facility weeks in advance. This avoids the long lead times often associated with new fiber installs. Adjust your DNS TTL (Time to Live) values at least 48 hours before the move. This ensures that traffic shifts to the new IP address space almost instantly once the hardware is live. Verifying IP address space portability now will prevent routing black holes during the execution phase.
Execution Phase: Logistics, Security, and Move-Day Management
Security is just as critical as hardware safety. You must implement a strict chain-of-custody protocol. Every server, switch, and storage array should be scanned by serial number at the point of egress and again upon ingress at the new facility. This prevents “lost” assets and ensures that your hardware inventory remains accurate throughout the move. Establish a real-time communication bridge between the origin site, the destination, and your primary stakeholders. A live voice line or a dedicated “War Room” channel ensures that if a truck is delayed or a rack isn’t ready, the entire team can pivot immediately.
Physical Logistics and Hardware Protection
Standardized labeling is the difference between a four-hour rack-and-stack and a forty-hour troubleshooting nightmare. Label every cable and port before disconnection. Use anti-static packaging for every individual blade and specialized server lifts for high-density cabinets to prevent technician injury or equipment drops. Coordinating move-in assistance before the trucks arrive allows you to streamline dock access and secure elevator priority. This ensures your hardware moves directly from the climate-controlled truck to the data hall without sitting in a loading bay.
The Role of Remote Hands During Deployment
Remote hands aren’t just for emergency reboots. During a migration, they serve as your eyes and ears on the ground. Utilizing remote hands support for physical troubleshooting and professional cable management can save your internal team dozens of hours. Define clear escalation paths for on-site technicians during the first 24 hours of deployment. When you integrate remote hands with your internal IT teams, you create a seamless virtual-to-physical handoff. This allows your senior engineers to focus on software validation while the facility staff handles the physical layers of the stack.
Post-Migration: Validation, Testing, and Optimization
The migration isn’t finished once the final server is racked. The post-migration phase is where you validate your planning and ensure the new environment meets the performance standards required for 2026 workloads. This stage of the colocation migration checklist for enterprises focuses on ‘Day Zero’ validation. You must execute a pre-defined ‘Smoke Test’ for every critical application and database. These tests should be binary. Either the system is fully functional according to pre-migration benchmarks, or it requires immediate remediation. Don’t assume connectivity equals performance.
Validating network throughput and latency against pre-migration baselines is essential. Use automated tools to measure packet loss and jitter from various geographic points. You should also conduct a power-fail test. While it sounds risky, verifying UPS and PDU redundancy at the rack level ensures that your N+1 configuration actually works under load. This is especially important if you’ve moved high-density AI clusters that draw significant power. Finally, audit environmental conditions like temperature and humidity across all private suites. Ensure they align with ASHRAE standards to prevent thermal throttling on your most expensive hardware. If you find discrepancies, adjust your airflow management immediately.
Application and Database Integrity Testing
Verify data replication and synchronization between your primary site and failover locations. Any lag here could compromise your RPO. Test application response times from various national access points. This ensures the move hasn’t introduced geographic latency issues for your end users. Document any ‘drift’ in performance metrics compared to your previous environment. If a database query is 10ms slower than before, you must find the bottleneck before it impacts production. A successful move should result in performance parity or improvement, never a regression.
Security and Compliance Post-Audit
Re-scan for vulnerabilities immediately after the move. Firewall rules often require adjustment when IP address spaces change. Verify physical access controls, including biometric logging and camera coverage, for all cage solutions. This ensures your compliance posture remains intact for SOC2 or HIPAA requirements. Update your disaster recovery documentation to reflect the new physical infrastructure. If you need assistance with post-migration optimization, contact our engineering team to ensure your new environment is tuned for maximum stability and speed.
Selecting an Enterprise Partner for National Scalability
Choosing the right partner is the final, most consequential step in your journey. A facility’s carrier neutrality isn’t just a technical feature. It’s a business safeguard. It allows you to switch between network providers for better pricing or improved redundancy without moving your hardware. When finalizing your colocation migration checklist for enterprises, prioritize providers that offer a clear path for growth. You might start with a few racks, but your infrastructure must be able to expand into private suites as your data needs evolve. Scalability ensures you won’t outgrow your environment in eighteen months.
Technical expertise must be available 24/7/365. If a hardware failure occurs at 3:00 AM, you can’t wait for a technician to commute to the site. On-site staff should have the skills to handle complex rack-and-stack tasks and initial network configurations. This level of support provides a layer of security that off-site teams simply can’t match. Matching your infrastructure density to future AI and machine learning workloads is also vital. Facilities that support high-density power delivery are better equipped to handle the 50kW+ racks that are becoming standard for modern enterprise compute clusters.
Why High-Density Infrastructure Matters
Efficiency drives ROI. Packing more compute into fewer full cabinet colocation units reduces your physical footprint and lowers overhead costs. Specialized cooling and power delivery are no longer optional. They’re requirements for maintaining hardware longevity and system stability. As you prepare for a hybrid cloud model, managed interconnection becomes the bridge between your physical assets and the public cloud. This approach allows you to maintain control over your most sensitive data while leveraging the elasticity of cloud services for burst workloads.
Seamless Move-In with 3EX Hosting
A flawless transition requires more than just a good plan. It requires a partner that understands the stakes. We provide white-glove move-in assistance for national enterprise deployments, handling the heavy lifting so your engineers can focus on core business logic. Our 24/7 remote hands team extends your internal IT reach, providing expert support whenever you need it. Don’t leave your migration to chance. Request a customized quote tailored to your specific cabinet and cage requirements to start your zero-downtime transition today.
Securing Your Enterprise Infrastructure for 2026 and Beyond
A successful transition isn’t just about moving hardware; it’s about engineering long-term stability. Utilizing a colocation migration checklist for enterprises ensures you’ve accounted for the high-density requirements of modern AI workloads and the hidden complexity of legacy interdependencies. By prioritizing carrier-neutrality and performing rigorous post-migration validation, you protect your mission-critical uptime and prepare for future scale. Precision in the planning phase eliminates the risks that lead to costly downtime or performance regressions during the physical move.
Ready to secure your infrastructure’s future? Request a custom colocation migration quote from 3EX Hosting today. Our engineering team is standing by to ensure your next move is your most stable and efficient one yet.
Frequently Asked Questions
How long does a typical enterprise colocation migration take?
A typical enterprise migration requires three to six months of planning followed by a 24 to 72 hour execution window. The timeline depends heavily on the complexity of your application interdependencies and the volume of physical hardware. Using a colocation migration checklist for enterprises helps compress this schedule by identifying long-lead items, such as new carrier circuit installations, early in the process.
What is the difference between a lift-and-shift and a swing migration?
A lift-and-shift migration involves powering down, unearthing, and physically moving your existing hardware to the new site. A swing migration involves setting up a parallel environment with new or temporary hardware at the destination first. Swing migrations are the gold standard for zero-downtime transitions because they allow you to synchronize data and test the new environment before decommissioning the old site.
How do we minimize downtime during a physical server move?
You can minimize downtime by utilizing a parallel network architecture and pre-provisioning all cross-connects at the target facility. Shortening your DNS TTL values to 300 seconds or less 48 hours before the move ensures that traffic redirects quickly once the hardware is live. For physical moves, a phased approach that migrates non-critical workloads first allows you to refine the logistics before moving production systems.
What insurance coverage is required for transporting enterprise IT hardware?
You need a specialized transit insurance policy that covers the full replacement value of your IT assets during move-day. Standard business property insurance often excludes equipment once it leaves your primary facility. Ensure your chosen logistics partner provides a certificate of insurance that specifically covers electronic data processing (EDP) equipment and includes coverage for mechanical or electrical derangement during transit.
Can we migrate our network without changing our IP addresses?
Yes, you can maintain your existing IP addresses by leveraging BGP (Border Gateway Protocol) if you own your IP prefixes. If you’re using provider-assigned space, you’ll need to implement Layer 2 extensions or specialized tunneling to bridge the old and new sites during the move. This allows your applications to keep their internal configurations while you update external records at your own pace.
How do we audit a colocation facility for AI and GPU density readiness?
Audit the facility’s power distribution and thermal management capabilities at the individual rack level. Many 2026 AI workloads demand 50kW per rack or more, which can overwhelm traditional cooling systems. Verify that the provider offers high-density power circuits and has the floor load capacity for heavy GPU clusters. You should also check for specialized airflow containment or liquid cooling support to prevent thermal throttling.
What role does remote hands support play in a successful migration?
Remote hands support serves as your on-site technical team for the physical layer of the migration. They handle the rack-and-stack process, professional cable management, and initial hardware power-on. This allows your senior engineers to stay focused on high-level software validation and database integrity. Having expert support on-site 24/7 ensures that physical troubleshooting happens immediately without waiting for your team to arrive at the facility.
Should we move our disaster recovery site before or after our primary site?
You should always migrate your disaster recovery (DR) site first to ensure a functional safety net is active during the primary move. Establishing the DR environment at the new location allows you to validate network performance and power stability with lower-risk workloads. Once the DR site is synchronized and tested, you can proceed with the primary migration knowing that you have a verified fallback if any issues arise.